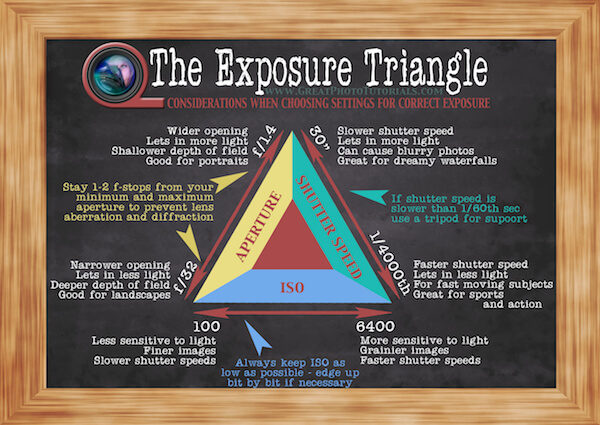
The exposure triangle is a very common graphic illustration used to teach people about the 3most important elements in photography. No doubt you’ve seen it in various forms all over the internet as you searched for photography tips and tricks.
Yes - I have created one for students too (it's in the free access section of our Members Area) but I was always perplexed with the concept that it tried to illustrate, it made everything more complicated than it is!
Maybe it just evolved as a simple assumption to put the 3 elements into a 3 sided shape…but it does not show the the all important relationship between the elements which is the most important understanding to have in achieving correct exposure - it is what it’s supposed to be all about!
The problem arises when you look at one point of the triangle - say for example the bottom left point in the above illustration - 100 ISO and f/1.4 connect at the point - but this is irrelevant - the aperture side could just as easily have been the other way around so the 32 was at that point. There is no correct illustration of their connection in the Exposure Triangle.
This relationship between the elements is called the 'Law of Reciprocity' in photography and there is no way to ‘understand’ this law in the triangle. All the triangle demonstrates is that there are indeed 3 elements to understand and that there are effects caused by these elements (Depth of field, motion blur, and noise) depending on your chosen settings. It all relies on remembering which element causes what effect in the graphic rather than understanding it, and totally misses the effect one element has on the other.
Explaining the effects caused by various Aperture, Shutter Speed and ISO settings is better illustrated in parallel bars (see the Exposure Effects Guide in Part 2 below).
 So, I have devised a new graphic - the Exposure Box!…It could also be successfully illustrated in a circle…but I didn’t want to cause confusion with the various camera aperture graphics you’ll see around the internet.
Enough rambling - lets get into it!
The first part is the WHAT - what happens when we choose different settings - the law of reciprocity - high or low ISO, fast or slow shutter speed, wide or narrow aperture - this is best illustrated by the Correct Exposure Box.
The second part is the WHY - why we choose the settings we choose - the effects they cause within the image - high or low ISO, fast or slow shutter speed, wide or narrow aperture - best illustrated in the Exposure Effects Guide.
You can download the full size Exposure Box and Exposure Effects Cheat Sheets from our members area - sign in for free here: https://www.greatphototutorials.com/free-members-access
Part 1 - The Exposure Box
The box as a whole represents correct exposure, the correct amount of light. Ultimately the box is always perfectly full of the 3 elements - no more and no less. If there was empty space it would represent under exposure, and if there was overflow it would represent over exposure.
Click the image below to see the GIF in action!
Login to download this cheat sheet at:
https://www.greatphototutorials.com/free-members-access
The 3 elements have flexibility and have to adjust to each other - it's give and take - the law of reciprocity - watch the gif above...
As you can see in the animation - when there is more ISO (bottom section), there needs to be less of the Aperture and Shutter Speed (top section), and visa versa to maintain the box at it's perfect correct size (exposure).
So what it is saying is that when you use more aperture, in other words when you let more light in via the aperture, you will need less light from the shutter speed for a correctly exposed image.
In regard to the ISO, when you have more light or to be precise - more light ‘sensitivity’ which is what ISO is, you will need less light from the aperture and shutter speed to maintain correct exposure.
Aperture and Shutter speed control the amount of light that reaches the sensor. ISO controls the sensitivity of the sensor to light.
- Aperture - wide open - lower number f/stops = more light
- Aperture - stopped down/narrow - higher number f/stops = less light
- Shutter Speed - slower shutter speeds = more light
- Shutter Speed - faster shutter speeds = less light
- ISO - higher ISO numbers = more sensitivity to light
- ISO - lower ISO numbers = less sensitivity to light
It’s all just common sense, like when you put your foot down on the accelerator in the car - you know you are going to go faster, and foot off is slower, or when you turn the tap on - you know which way to turn the handle to control the flow for more or less water. You just have to think about it a bit more in the beginning but it will become second nature with a little practice. Faster shutter speeds let in less light. Wider apertures let in more light...and visa versa.
To learn more about exposure and light and heaps of tips and tricks to control your settings head over to Photography Basics - the quick course - not just for beginners but for anyone who is still on Auto and ought not be!!
Part 2 - Exposure Effects Guide
These are the effects caused by each element individually - aperture, shutter speed, and ISO. We’ll work with one element at a time here.
Aperture - Depth of Field
Apart from controlling how much light reaches the sensor as we learnt in Part 1, the aperture also controls Depth of Field (DOF) or how much depth of the field of view (or scene) that is in focus.
Why does it matter? Sometimes the background in an image is not important, or a bit distracting, like in a portrait. Sometimes having everything in the scene in focus is important, like a landscape with an interesting feature in the foreground. So use a wide/ low number f/stop for portraits that really 'pop' and use a narrow/large number f/stop when you have a lot of important objects at varying distances that are important in the scene for tack sharp landscapes.
There is a bit of fine tuning you can do here too - check out Photography Basics for more in-depth training here.


Shutter Speed - Motion Blur
So the shutter speed is used to create or prevent motion blur.
Why does it matter? The shutter speed may need to be very slow when necessary to let in enough light, and this can cause an unwanted blurry image. There are also times where blur is intentional and looks great as it expresses motion.
We've all had burry photos that are just not good, and maybe you've had some that actually turned out great - though not planned that way. As a basic rule, anything under 1/60 second has the potential to blur unintentionally depending on how steady your hand is, whether you have a tripod, and how fast the subject may be moving. It all depends on the speed your subject and the speed of the shutter!


ISO - Noise
The ISO setting adjusts the sensor's sensitivity to light. It is used when the shutter speed it too low and needs to be faster to get the shot.

Why is this important? When you raise the ISO (higher numbers), less light will be needed to get a correct exposure, therefor you will be able to use faster shutter speeds and avoid motion blur. The problem arises with the quality of the image which becomes grainy or 'noisy' the more you increase the sensitivity. The newer the camera the less of a problem this is but at high ISO settings it can be very noticeable and the image will also look flatter in colour and less sharp.
Check out our Photography Basics Course - not just for beginners but for anyone who is still on Auto and ought not be!!

